

Import and Export Data
Connecting Data Sources

Updated
October 16, 2023
If you are working with data stored in a database or hosted somewhere on the cloud, it's often simpler and more efficient to load your data directly into Graphext. By connecting a database or remotely hosted dataset with Graphext, you create a link between your workspace and the source of your data. You only have to integrate a data source with your Graphext workspace once.
Then each time you want to update your project with the latest data, you would refresh the project. This action will retrieve your data in its most up to date form, meaning that you can start analyzing recent data straight away.
Supported data sources
.png)
Google BigQuery
How to connect Google Big Query?
- Click on “New Project” (this will add the integration to your personal team) or the “Integrations” button inside the team you want to work on.
- Select “Big Query” from the integrations list.
- Click on “Continue with Google.”
- Select your Google account and ”Allow” from the Google sign-in permissions window.
- Head to the Big Query webpage and copy your Project ID by clicking on the dropdown to the right of the Google Cloud logo. Paste it in the field labeled “Project ID.”
- Create your SQL query using the Big Query editor or your favorite editor, and paste it in the field labeled “Query.”
- If you would like other members to edit the query only. Select “Allow team members to edit the above query.”
- If you want Graphext to write back the project's output to Big Query. Select “Allow write output.” View more documentation about this step here.
- Click on “Save and create project” to retrieve your data and begin exploring or “Save” the integration for later use.
Snowflake
How to connect Snowflake?
- Click on “New Project” (this will add the integration to your personal team) or the “Integrations” button inside the team you want to work on.
- Select “Snowflake” from the integrations list.
- Introduce your account “Username” and “Password.”
- Head to the Snowflake webpage, open the Admin page and click on Accounts.
- Hover directly to the right of the Account label, and click the icon to copy the URL. Paste it in the field labeled “Account ID / URL.”
- Create your query using the Snowflake Worksheets or your favorite editor, and paste it in the field labeled “Query.” Make sure to access the full path.
- If you would like other members to edit the query only. Select “Allow team members to edit the above query.”
- If you want Graphext to write back the project's output to Snowflake. Select “Allow write output.”
- Click on “Save and create project” to retrieve your data and begin exploring or “Save” the integration for later use.
Amazon Redshift
How to connect Amazon Redshift?
(Make sure that your cluster is available for connection and that you have configure the IP correctly, in case you need help, we explain you how to do it in the section below "Configure the availability of your cluster and the IP")
- Click on “New Project” (this will add the integration to your personal team) or the “Integrations” button inside the team you want to work on.
- Select “Amazon Redshift” from the integrations list.
- Add your account “Username” and “Password.”
- Head to the AWS webpage and select the cluster you want to use.
- From the database configurations, copy the “Database” name, the “Port”, and the “Host” and paste them into the corresponding fields.
- Create your query using the AWS console or your favorite editor, and paste it in the field labeled “Query.”
- If you would like other members to edit the query only. Select “Allow team members to edit the above query.”
- If you want Graphext to write back the project's output to Amazon Redshift. Select “Allow write output.”
- Click on “Save and create project” to retrieve your data and begin exploring or “Save” the integration for later use.
Configure the availability of your cluster and the IP
Head to Amazon Redshift and make your cluster publicly available.
Ensure you configure the Inbound rules with the correct IP and Port.
PostgreSQL
How to Connect a PostgreSQL Database?
- Click on “New Project” (this will add the integration to your personal team) or the “Integrations” button inside the team you want to work on.
- Select “PostgreSQL” from the integrations list.
- Complete the form by entering your "Username", "Password", "Host", "Port" and "Database key".
- Create your query using your favorite editor, and paste it in the field labeled “Query.”
- If you would like other members to edit the query only. Select “Allow team members to edit the above query.”
- If you want Graphext to write back the project's output to PostgreSQL. Select “Allow write output.” View more documentation about this step here.
- Click on “Save and create project” to retrieve your data and begin exploring or “Save” the integration for later use.
Databricks
How to connect Databricks?
- Click on “New Project” (this will add the integration to your personal team) or the “Integrations” button inside the team you want to work on.
- Head to the Databricks webpage, go to SQL Warehouses, select the one you want to work with, and click on the connection details section.
- Copy the Server hostname, and paste it into the field labeled “Host.”
- Copy the HTTP path, and paste it into the corresponding field.
- Head to your Databricks User Settings, select the Access Tokens tab,and copy your token or generate a new one. Paste it into the appropriate field.
- Create your query using the Databricks SQL editor or your favorite editor, and paste it in the field labeled “Query.”
- If you would like other members to edit the query only. Select “Allow team members to edit the above query.”
- If you want Graphext to write back the project's output to Databricks. Select “Allow write output.”
- Click on “Save and create project” to retrieve your data and begin exploring or “Save” the integration for later use.
MySQL
How to Connect a MySQL Database?
- Click on “New Project” (this will add the integration to your personal team) or the “Integrations” button inside the team you want to work on.
- Select “MySQL” from the integrations list.
- Complete the form by entering your "Username", "Password", "Host", "Port" and "Database key".
- Create your query using your favorite editor, and paste it in the field labeled “Query.”
- If you would like other members to edit the query only. Select “Allow team members to edit the above query.”
- If you want Graphext to write back the project's output to MySQL. Select “Allow write output.” View more documentation about this step here.
- Click on “Save and create project” to retrieve your data and begin exploring or “Save” the integration for later use.
SQL Server
How to Connect an SQL Server?
- Click on “New Project” (this will add the integration to your personal team) or the “Integrations” button inside the team you want to work on.
- Select “SQL Server” from the integrations list.
- Complete the form by entering your "Username", "Password", "Host", "Port" and "Database key".
- Create your query using your favorite editor, and paste it in the field labeled “Query.”
- If you would like other members to edit the query only. Select “Allow team members to edit the above query.”
- If you want Graphext to write back the project's output to SQL Server. Select “Allow write output.” View more documentation about this step here.
- Click on “Save and create project” to retrieve your data and begin exploring or “Save” the integration for later use.
Azure SQL
How to Connect an Azure SQL database?
- Click on “New Project” (this will add the integration to your personal team) or the “Integrations” button inside the team you want to work on.
- Select “Azure SQL” from the integrations list.
- Complete the form by entering your "Username", "Password", "Host", "Port" and "Database key".
- Create your query using your favorite editor, and paste it in the field labeled “Query.”
- If you would like other members to edit the query only. Select “Allow team members to edit the above query.”
- If you want Graphext to write back the project's output to Azure SQL. Select “Allow write output.” View more documentation about this step here.
- Click on “Save and create project” to retrieve your data and begin exploring or “Save” the integration for later use.
Amazon S3
How to Connect an Amazon S3 Bucket?
- Click on “New Project” (this will add the integration to your personal team) or the “Integrations” button inside the team you want to work on.
- Select “Amazon S3” from the integrations list.
- Head to the AWS webpage and click on Security Credentials, which you will find in the dropdown in the top right corner.
- Copy the Access Key ID, and paste it into the corresponding field.
- Copy your “Secret Access Key” (in case you don’t find it; below we explain how to generate one), and paste it into the field labeled “AWS Secret.”
- Use the “Region name” dropdown to select the AWS region name of your bucket.
- Copy the “Bucket Name" in the Buckets tab and paste it into the corresponding field.
- Enter the desired bucket, and copy the file path you want to connect to. If you have folders inside the bucket, follow this format “folder/example_dataset.csv”. Paste it into the “Path” field.
- If you want Graphext to write back the project's output to Amazon S3. Select “Allow write output.” View more documentation about this step here.
- Click on “Save and create project” to retrieve your data and begin exploring or “Save” the integration for later use.
Create an Access Key
- Click on Security Credentials.
- Scroll down and click on Create Access Key.
- Save the Access Key and the Secret.
Google Cloud Storage
How to Connect Google Cloud Storage?
- Click on “New Project” (this will add the integration to your personal team) or the “Integrations” button inside the team you want to work on.
- Select “Google CS” from the integrations list.
- Click on “Continue with Google.”
- Select your Google account and ”Allow” from the Google sign-in permissions window.
- Head to the Google Cloud webpage and open the Buckets section. Copy the name of the desired bucket, and paste it into the field labeled “Bucket Name.”
- Open the desired bucket in Google CS, and copy the file name you want to import. Paste it in the field labeled “Source Blob Name.”
- Copy your Project ID by clicking on the dropdown to the right of the Google Cloud logo. Paste it in the field labeled “Project ID.”
- If you want Graphext to write back the project's output to Google CS. Select “Allow write output.”
- Click on “Save and create project” to retrieve your data and begin exploring or “Save” the integration for later use.
Azure Blob Storage
How to Connect a Azure Blob Storage?
- Click on “New Project” (this will add the integration to your personal team) or the “Integrations” button inside the team you want to work on.
- Select “Azure Blob Storage” from the integrations list.
- Head to Azure Blob Storage webpage, and select the desired Storage account.
- In the Security + networking tab, click on the Access Keys. Copy the Storage Account name, and paste it into the field labeled “Account Name.”
- Copy the “Key” from Azure, and paste it into the field labeled “Account Key.”
- Navigate to the Containers tab under the Data Storage section, copy the name of the desired container, and paste it into the corresponding field.
- Enter the desired container, copy the file name, and paste it into the field labeled “Blob Name.”
- If you want Graphext to write back the project's output to Azure Blob Storage. Select “Allow write output.” View more documentation on this step here.
- Click on “Save and create project” to retrieve your data and begin exploring or “Save” the integration for later use.
Google Drive
How to Connect Datasets on Google Drive?
- Click on “New Project” (this will add the integration to your personal team) or the “Integrations” button inside the team you want to work on..
- Select “Google Drive” from the integrations list.
- Click on “Continue with Google”
- Select your Google account and ”Allow” from the Google sign-in permissions window.
- Navigate to the desired file in Google Drive.
- Click on the three dots menu at the top right corner of the file and select “Get Link.”
- Change the General access to Anyone with the link, copy it, and paste it into the field labeled “Shareable link.”
- If you would like other members to edit the URL only. Select “Allow team members to edit the URL.”
- If you want Graphext to write back the project's output to Google Drive. Select “Allow write output.” View more documentation on this step here.
- Click on “Save and create project” to retrieve your data and begin exploring or “Save” the integration for later use.
Tinybird
How to Connect Tinybird?
- Click on “New Project” (this will add the integration to your personal team) or the “Integrations” button inside the team you want to work on.
- Select “Tinybird” from the integrations list.
- Head to the Tinybird webpage and click the “Auth tokens” section. Copy your token and paste it into the field labeled “Access Token.”
- Copy the name of the desired pipe, and paste it into the field labeled “Pipe.” Make sure that the pipe is connected to a data source.
- If you want Graphext to write back the project's output to Tinybird. Select “Allow write output.”
- Click on “Save and create project” to retrieve your data and begin exploring or “Save” the integration for later use.
Google Sheets
How to Connect Google Sheets?
- Click on “New Project” (this will add the integration to your personal team) or the “Integrations” button inside the team you want to work on.
- Select “Google Sheets” from the integrations list.
- Click on “Continue with Google.”
- Select your Google account and ”Allow” from the Google sign-in permissions window.
- Navigate to the desired file in Google Sheets.
- Copy the URL from the browser (not the shareable link) and paste it into the field labeled “Browser URL of the desired sheet.” Note we can only retrieve the data from the sheet you select, not all the sheets in your file.
- If you would like other members to edit the URL only. Select “Allow team members to edit the URL.”
- If you want Graphext to write back the project's output to Google Sheets. Select “Allow write output.”
- Click on “Save and create project” to retrieve your data and begin exploring or “Save” the integration for later use.
Notion
How to Connect Notion?
- Click on “New Project” (this will add the integration to your personal team) or the “Integrations” button inside the team you want to work on.
- Select “Notion” from the integrations list.
- Click on “Continue with Notion.”
- Click on “Select Pages” from the Notion’s permissions window.
- Navigate and select the pages you want and click on the Allow access button.
- Head to Notion, go to the three dots menu on top of the database you want to import, select “Link to view” and paste it into the field labeled “Link to the database view”
- If you want Graphext to write back the project's output to Notion. Select “Allow write output.”
- Click on “Save and create project” to retrieve your data and begin exploring or “Save” the integration for later use.
Edit integrations
Once you have configured your integration, you can modify some of the fields, rename it, or even delete it. To access the edit modal, you first need to access the list of existing integrations. There are two ways to do this:
- Click on the "New Project" button, and on the left-hand side, you will see the "Existing Integrations" section.
- In the top left corner, you will see the number of existing integrations. Click on it to access the modal to manage the "Existing Integrations".
From this list of integrations, you can edit existing integrations, and you can also create a new project using the same integration.
Refresh projects
One of the greatest benefits of creating a project from an integration is being able to update it with new data without needing to import them again. To update the project, you have two options:
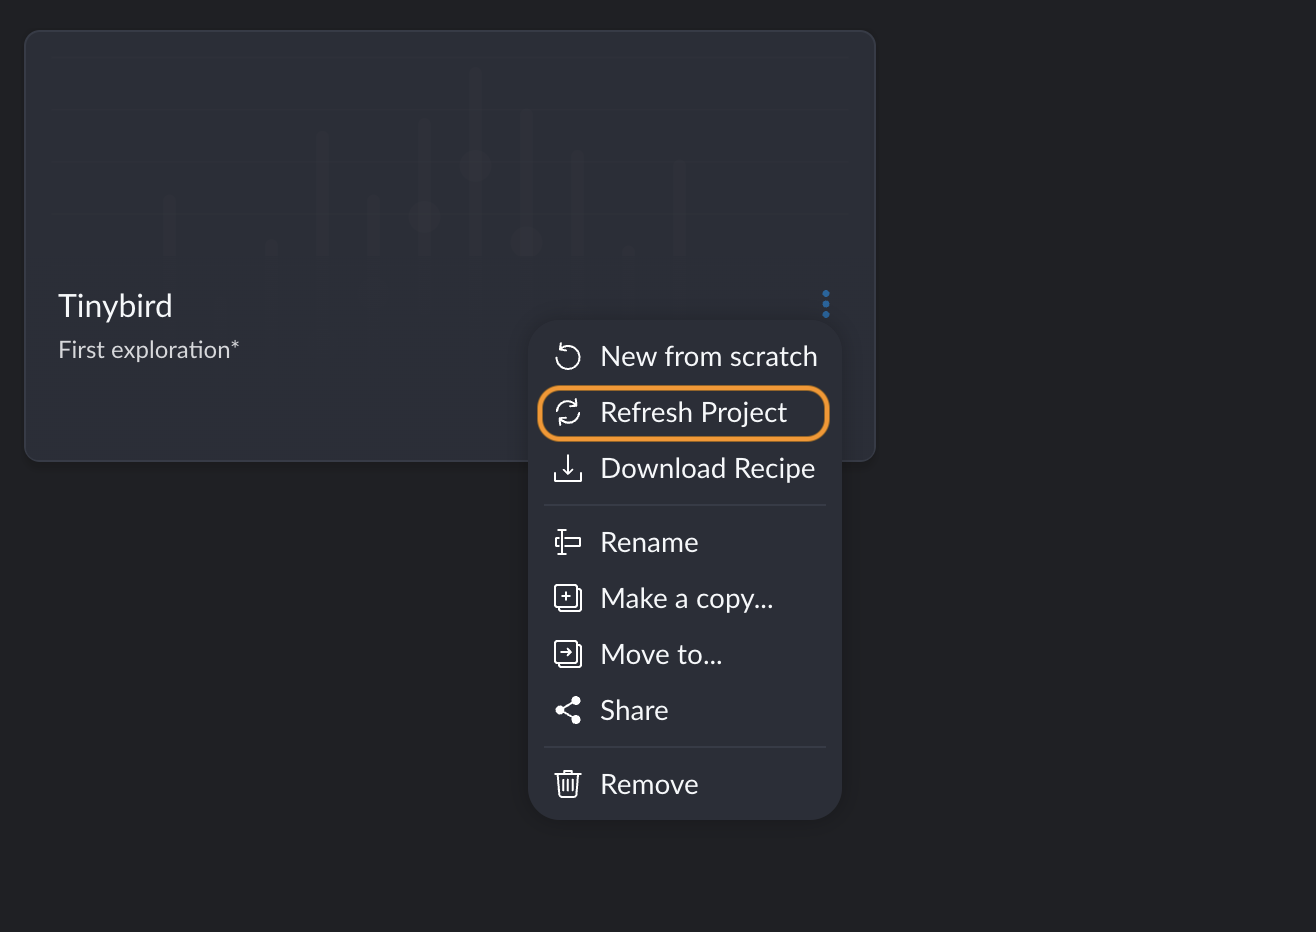
From the hall, where you have a view of all the cards of your projects, you can hover over the project with the integration, click on the three vertical dots, and then click on "update project".
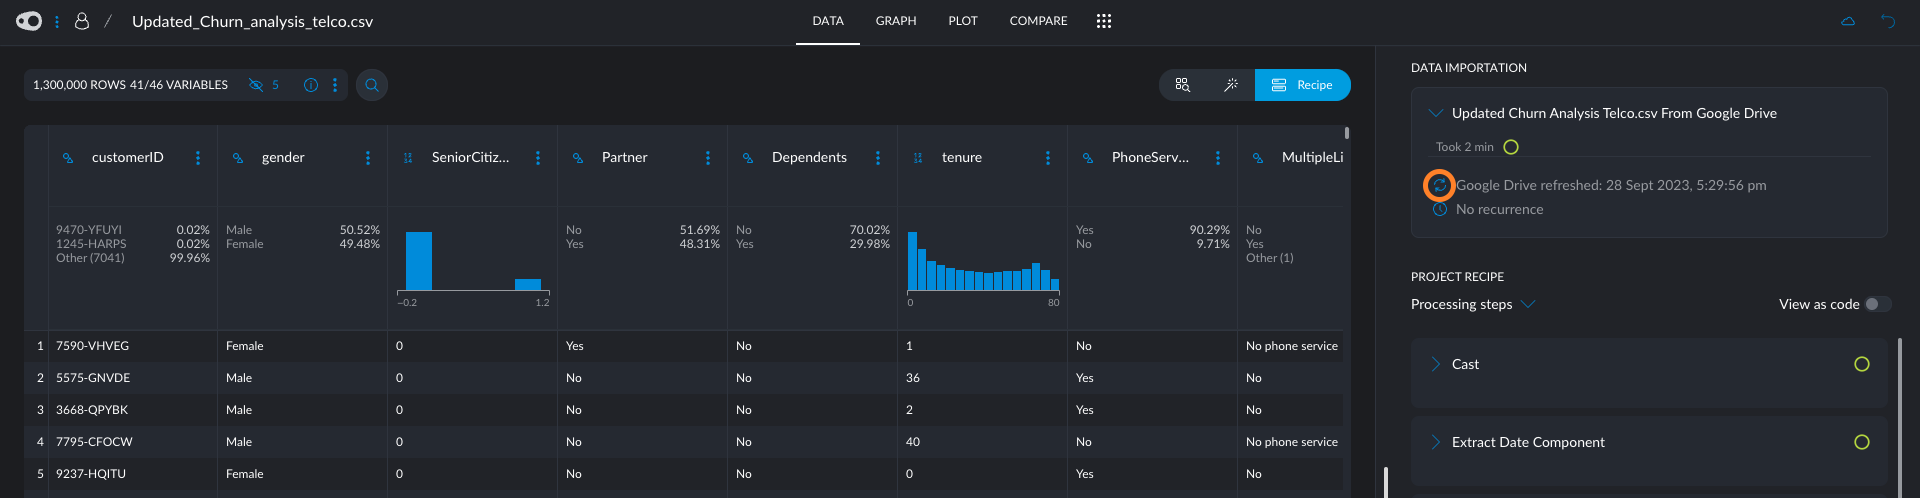
Within the project, in the data section, you will find an icon with two circular arrows on the data importation block. Clicking on this icon will update the project with the latest data.
Refresh troubleshooting
As you know Graphext projects can be created using data from various integrations, such as databases, online files, or services like Notion or Google Sheets.
Once a project is created from an integration, users can request data refresh. This action will prompt Graphext to connect to the data source and re-execute the same request that was used to create the project, bringing in the latest data available from the source.
Under normal circumstances, this process should run smoothly, and in short time, you'll have your project updated with new data, and all recipe steps will be re-executed with the updated information. The time it takes for this process to complete may vary depending on the data volume, data source transfer speed, or whether the recipe contains computationally intensive steps.
However, occasionally things may not go as planned. Let's explore some common issues and their solutions:
Connection Failure
A typical problem users encounter is a connection failure. This could be caused by a temporary glitch with your data source or an intermediary service between Graphext and your data source. The solution is often as simple as trying again later.
Another possibility is that the connection error is due to authentication issues. Please check if the credentials you provided to Graphext are still valid. Verify that your password, credentials, or access permissions to the data source have not changed.
Resource Not Found
In some cases, you might encounter a "resource not found" error. This can occur if the file or table from the database is no longer available at the specified location. Make sure it has not been moved or deleted. Review the path or query of your integration to ensure it points to the correct location.
Schema Changes
At Graphext, we value ensuring users don't draw incorrect conclusions. One potential source of errors can be changes in the original data schema. These changes in the data source can be intentional or unintentional. Hence, whenever the schema changes between refreshes, we notify the user.
If the data type of a column has been changed, it's possible that the recipe is no longer compatible with the new type. To make the project work with the new data, the user needs to adjust the recipe to accommodate the new types or revert the schema changes in the data source.
If a column that the project used in any recipe step has been deleted, a similar situation occurs, and the user must adapt the recipe or revert the changes in the database.
If new columns are added, the usual solution is to accept the changes and let Graphext update the project accordingly. In rare cases, a new column might have a name that conflicts with an existing recipe step, and the user may need to change the name in the data source or the generated column in the recipe.
We hope this troubleshooting guide helps you understand and resolve any issues you may encounter during data refresh in your Graphext projects. Should you need further assistance or have any questions, please don't hesitate to contact our support team.
In case it helps, here is a diagram summarizing all the scenarios:

Need Something Different?
We know that data isn't always clean and simple.
Have a look through these topics if you can't see what you are looking for.
CONTENTS

